ATtiny85はピン数が少なすぎて、すぐに飽きてしまったので、ピン数が多いマイコンを買ってきました。ATtiny2313です。
今回はHEXの書き込みだけです。ブレッドボード画像作成ツールbread.shも大活躍です。
ブレッドボードの配線はこのとおり。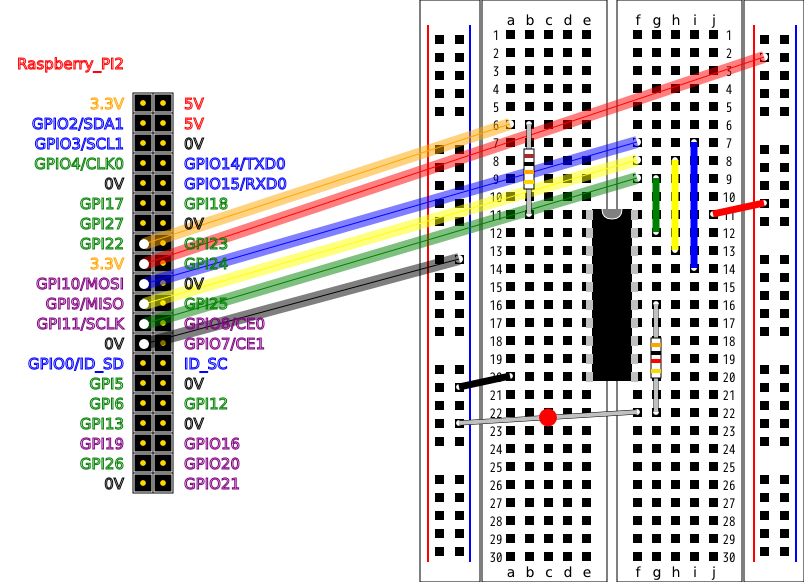
この配線に合わせて、avrdude.confの設定は以下のようにしています。
root@raspberrypi:~# grep 'id.*linuxgpio' -nA5 /etc/avrdude.conf
1109:  id    = "linuxgpio";
1110-  desc  = "Use the Linux sysfs interface to bitbang GPIO lines";
1111-  type  = "linuxgpio";
1112-  reset = 22;
1113-  sck   = 11;
1114-  mosi  = 10;
root@raspberrypi:~#
makefileとLED点滅プログラムはgithubにコミットしてますので、cloneします。
root@raspberrypi:~# git clone https://github.com/takkete/bread.git
root@raspberrypi:~# cd bread/mcu/avr/attiny2313
LEDが点滅するだけのテストプログラムです。
#include <avr/io.h>
#include <util/delay.h>

int main(void)
{
	DDRB = 0b00001000;      //ATtiny2313 pin.15 PB3 OUT

	while(1){
		PORTB ^= _BV(3);
		_delay_ms(1000);
	}

	return 0;
}

/*
                                  ATtiny2313
                          _____  +-----------+
                          RESET -|1        20|- VCC
                                -|2        19|- USCLK
                                -|3        18|- MISO
                                -|4        17|- MOSI
                                -|5        16|-
                                -|6        15|- PB3
                                -|7        14|-
                                -|8        13|-
                                -|9        12|-
                            GND -|10       11|-
                                 +-----------+
*/
ビルドは、そのままmake。
root@raspberrypi:~/bread/mcu/avr/attiny2313# make
avr-gcc -O2 -mmcu=attiny2313 -DF_CPU=1000000UL -c -o test.o test.c
avr-gcc -O2 -mmcu=attiny2313 test.o -o test
avr-objcopy -j .text -j .data -O ihex test test.hex
root@raspberrypi:~/bread/mcu/avr/attiny2313#
HEXを書き込みます。書き込みするのもmakefileを使ってます。make testwrite。
root@raspberrypi:~/bread/mcu/avr/attiny2313# make testwrite
avrdude -p t2313 -c linuxgpio -U flash:w:test.hex

(省略)

avrdude done.  Thank you.

root@raspberrypi:~/bread/mcu/avr/attiny2313#
書けました。

コメント